If you’re someone who deals with joint pain on a regular basis, you know how it can greatly impact your daily activities and overall quality of life. The good news is that there are simple and effective solutions to help alleviate joint pain, and one of them is yoga. In this article, you’ll discover a selection of yoga poses specifically designed to target and relieve joint pain. Whether you’re a beginner or an experienced yogi, these poses can be easily incorporated into your routine, providing you with much-needed relief and flexibility. So grab a yoga mat, find a quiet space, and get ready to embark on a journey of pain-free movement and well-being.
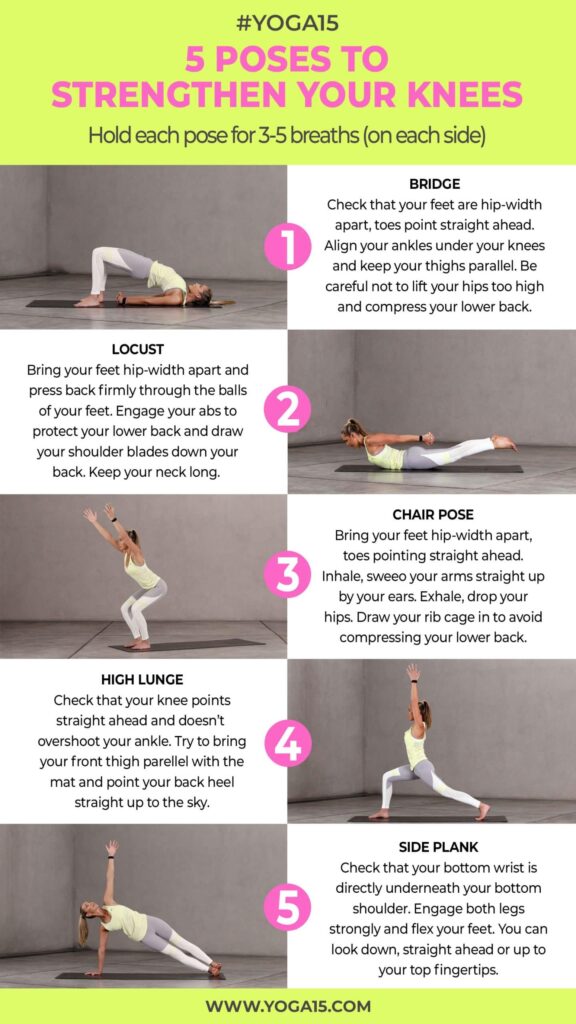
Benefits of Yoga for Joint Pain
Yoga is a gentle and effective way to alleviate joint pain and improve overall joint health. By incorporating yoga into your daily routine, you can experience a myriad of benefits that will not only provide relief but also promote long-term joint health. Whether you are dealing with joint pain due to age, injury, or a chronic condition, yoga can help. Let’s explore some of the key benefits of yoga for joint pain:
Increase flexibility and range of motion
One of the primary benefits of yoga for joint pain is the increase in flexibility and range of motion it offers. When your joints are stiff and immobile, it can be challenging to perform daily activities and even simple tasks. Yoga poses, such as Sukhasana (Easy Pose) and Marjaryasana-Bitilasana (Cat-Cow Pose), gently stretch and mobilize the joints, helping to improve their flexibility. With regular practice, you will notice that your joints become more supple, allowing you to move with ease and grace.
Strengthen muscles for better support
Weak muscles can put additional strain on your joints, leading to discomfort and pain. Yoga poses work not only on the joints but also on the muscles surrounding them. When you practice poses like Setu Bandhasana (Bridge Pose) and Virabhadrasana II (Warrior II Pose), you strengthen the muscles supporting your joints. This increased muscle strength helps provide better support and stability, reducing the risk of further joint damage and minimizing pain.
Reduce inflammation and swelling
Inflammation and swelling are common culprits behind joint pain. Fortunately, yoga can help alleviate these symptoms. Certain yoga poses, like Viparita Karani (Legs Up the Wall Pose), promote the circulation of blood and lymph fluids, which aids in reducing inflammation. The inverted position in this pose also helps to drain excess fluid from the legs and ankles, reducing swelling and providing relief.
Improve circulation and joint lubrication
Regular yoga practice improves blood circulation, delivering oxygen and important nutrients to the joints. Improved circulation helps to reduce inflammation, boost the healing process, and promote joint health. Additionally, yoga poses, such as Adho Mukha Svanasana (Downward-Facing Dog Pose), encourage the production of synovial fluid, which is responsible for lubricating the joints. Proper lubrication helps reduce friction, increase joint mobility, and alleviate joint pain.
Precautions Before Starting
Before diving into a yoga practice to ease joint pain, it’s important to consider a few precautions to ensure your safety and well-being. These precautions will help you make the most out of your yoga practice while minimizing the risk of further pain or injury. Here are some essential precautions to keep in mind:
Consult with a healthcare professional
Before starting any new exercise program or yoga routine, it’s crucial to consult with a healthcare professional, particularly if you have existing joint pain or a chronic condition. They can assess your specific needs and provide guidance on which yoga poses are safe for you. Your healthcare professional may also recommend modifications or adaptations to certain poses to suit your individual circumstances.
Choose the appropriate yoga style
Not all yoga styles are created equal when it comes to joint health. Some styles, such as gentle or restorative yoga, are particularly beneficial for individuals with joint pain. These styles focus on slow and deliberate movements, allowing you to ease into poses without putting unnecessary strain on your joints. Avoid high-impact or intense styles that may exacerbate your joint pain.
Use props for support
Yoga props, such as blocks, blankets, and straps, can be incredibly helpful in supporting your body and reducing strain on your joints. Props provide stability and enable you to modify poses to suit your comfort level. For example, if you have difficulty sitting with crossed legs in Sukhasana (Easy Pose), using a block or a blanket under your hips can alleviate pressure on your joints and make the pose more accessible.
Listen to your body
It’s essential to listen to your body throughout your yoga practice, especially when dealing with joint pain. If a pose feels uncomfortable or causes pain in your joints, it’s important to modify or skip that pose altogether. Every individual is unique, and what works for one person might not work for another. Trust your instincts and prioritize your comfort and safety above everything else.
Modify poses as needed
Yoga is a highly adaptable practice, and there are often multiple ways to approach a pose. If a particular pose causes discomfort, explore modifications that allow you to experience the benefits without aggravating your joint pain. For example, if Trikonasana (Triangle Pose) feels challenging, you can use a block to support your lower hand and reduce strain on your joints. Remember, it’s not about achieving a perfect pose, but rather finding the variation that works best for your body.
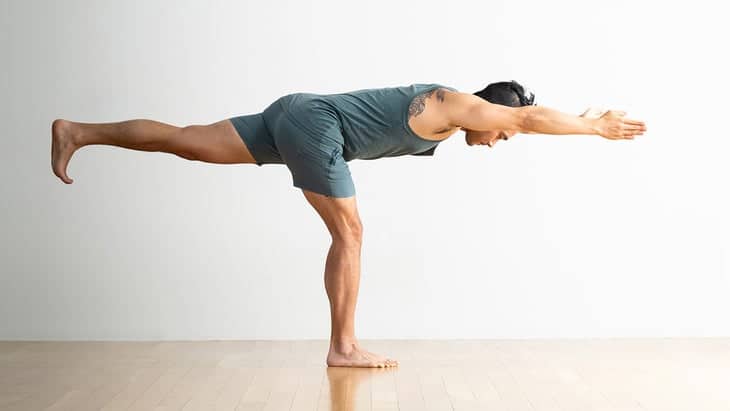
Sukhasana (Easy Pose)
Sukhasana, also known as Easy Pose, is a simple yet effective yoga pose that can help ease joint pain by gently stretching the hips and knees. It is a comfortable seated position that promotes relaxation and mindfulness. Here’s how to practice Sukhasana:
- Find a quiet and peaceful space to sit comfortably.
- Cross your legs, placing one foot in front of the other.
- Rest your hands on your knees, palms facing up or down, whichever is most comfortable for you.
- Sit up tall and lengthen your spine, imagining a string pulling the crown of your head towards the ceiling.
- Close your eyes and take deep, slow breaths, allowing your body to relax.
- Stay in this position for a few minutes, focusing on your breath and releasing any tension in your body.
Sukhasana gently stretches the hips and knees, promoting increased flexibility in these areas. By releasing tension in the lower back, it also helps alleviate discomfort in that region, which often radiates to the joints. Practice this pose daily to experience its full benefits and bring relief to your joint pain.
Marjaryasana-Bitilasana (Cat-Cow Pose)
Cat-Cow Pose, also known as Marjaryasana-Bitilasana, is a dynamic yoga pose that helps warm up and mobilize the spine. This pose is excellent for individuals with joint pain as it gently stretches the back and promotes synovial fluid production, lubricating the joints. Here’s how to practice Cat-Cow Pose:
- Begin on your hands and knees, with your hands shoulder-width apart and your knees hip-width apart.
- Align your wrists directly under your shoulders and your knees under your hips.
- Inhale and arch your back, lowering your belly towards the floor, lifting your chest and tailbone towards the ceiling. This is the Cow pose.
- Exhale and round your back, drawing your belly button towards your spine, lowering your head, and tucking your tailbone under. This is the Cat pose.
- Repeat these movements, flowing smoothly between Cat and Cow, syncing your breath with each movement.
- Continue for several rounds, allowing your spine to gently warm up and your joints to mobilize.
Cat-Cow Pose not only stretches and mobilizes the spine but also strengthens the core muscles that support the back and promote stability. By practicing this pose regularly, you can reduce joint pain and improve overall spinal health.
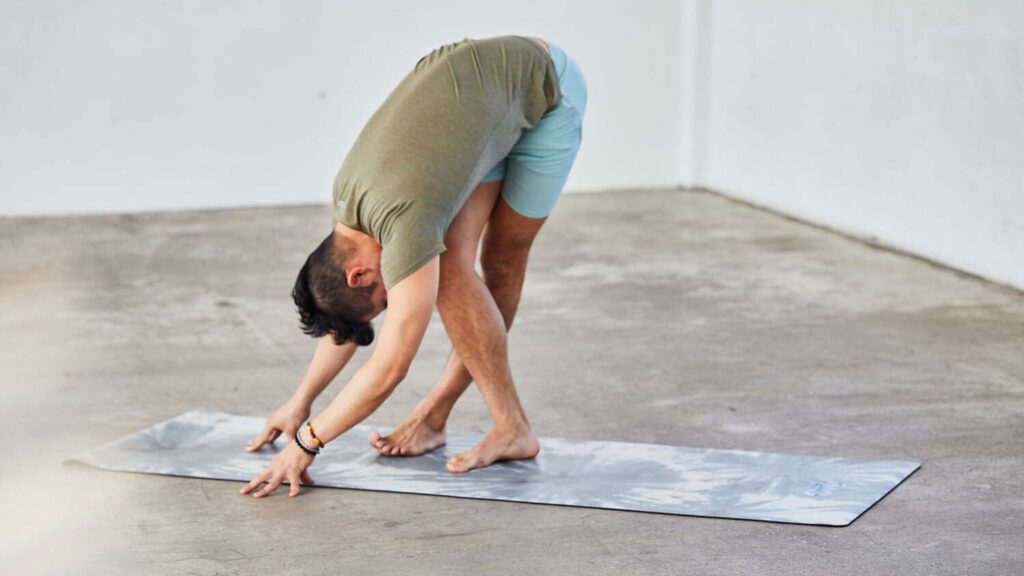
Balasana (Child’s Pose)
Relaxation and stress relief are essential when dealing with joint pain, and Balasana, or Child’s Pose, offers just that. This restorative yoga pose focuses on relaxing the back and hips while gently stretching the spine and shoulders. Here’s how to practice Balasana:
- Start on your hands and knees, with your hands shoulder-width apart and your knees hip-width apart.
- Slowly lower your hips back towards your heels, allowing your forehead to rest on the mat.
- Extend your arms forward, placing your palms on the mat or resting them alongside your body.
- Allow your body to melt into the pose, surrendering any tension or tightness.
- Take slow, deep breaths, letting go of any stress or strain with each exhale.
- Stay in this pose for several minutes, enjoying the calming effects it provides.
Balasana is a gentle pose that relieves tension in the neck and shoulders, common areas of discomfort for many individuals with joint pain. By elongating the spine and stretching the back, this pose promotes relaxation and rejuvenation, aiding in the alleviation of joint pain.
Trikonasana (Triangle Pose)
Trikonasana, or Triangle Pose, is a standing yoga pose that offers numerous benefits for joint pain. It helps improve flexibility and strength in the legs, while also stretching the side body and opening the chest. Trikonasana is especially beneficial for relieving lower back pain, which often accompanies joint discomfort. Here’s how to practice Trikonasana:
- Start standing with your feet about 3-4 feet apart, facing forward.
- Turn your right foot out 90 degrees and pivot your left foot inwards slightly.
- Exhale and extend your torso to the right, reaching your right hand towards your right shin or ankle. Your left arm should reach straight up towards the ceiling.
- Engage your core and make sure your torso is in one plane, not leaning forward or backward.
- Gently rotate your head to gaze at your left hand, if it’s comfortable for your neck.
- Hold the pose for several breaths, feeling the stretch in your legs and side body.
- To come out of the pose, inhale and engage your core as you slowly lift your torso back up. Repeat on the other side.
Trikonasana helps lengthen and strengthen the muscles around the joints, providing increased support and stability. By stretching the side body, it also helps relieve tension in the lower back, where joint pain often manifests. Practice Trikonasana regularly to enjoy its benefits and alleviate joint discomfort.
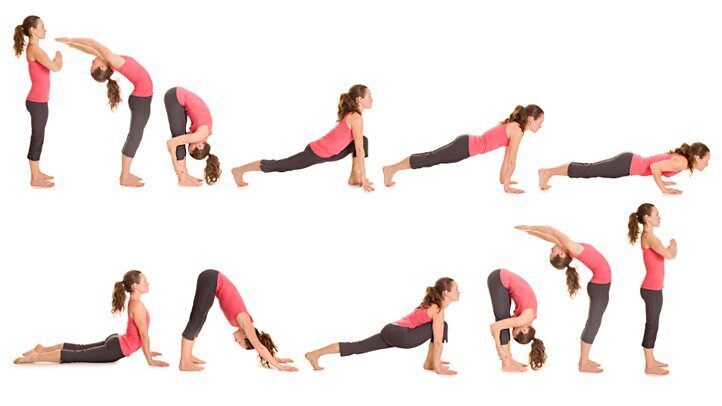
Setu Bandhasana (Bridge Pose)
Bridge Pose, known as Setu Bandhasana, is a gentle backbend that activates the glutes and hamstrings while opening the chest and shoulders. This pose stimulates the thyroid gland, which plays a crucial role in joint health. By incorporating Setu Bandhasana into your yoga practice, you can alleviate joint pain and improve overall joint function. Here’s how to practice Setu Bandhasana:
- Lie on your back with your knees bent, feet hip-width apart and flat on the mat.
- Extend your arms alongside your body, palms facing down.
- Engage your core and press your feet into the mat as you slowly lift your hips off the ground.
- Roll your shoulders back and interlace your fingers behind your back, extending your arms towards your feet.
- Keep your thighs parallel to each other and lengthen your tailbone towards your knees.
- Stay in this pose for several breaths, feeling the stretch in the front of your body and the activation in your glutes and hamstrings.
- To release, unclasp your hands, slowly lower your hips back down to the mat, and hug your knees to your chest.
Setu Bandhasana strengthens the muscles around the hip joint, providing better support for the joints themselves. The chest and shoulder opening aspect of this pose helps to counteract the hunched posture that often accompanies joint pain. Incorporating Bridge Pose into your yoga practice can bring relief and improve joint mobility.
Adho Mukha Svanasana (Downward-Facing Dog Pose)
Downward-Facing Dog Pose, or Adho Mukha Svanasana, is an iconic yoga pose that provides a full-body stretch, making it a valuable addition to any yoga routine aimed at relieving joint pain. This pose stretches the entire body, strengthens the upper body muscles, and relieves tension in the spine. Here’s how to practice Adho Mukha Svanasana:
- Start on your hands and knees, with your hands slightly forward of your shoulders and your knees directly under your hips.
- Curl your toes under, press into your hands, and lift your knees off the mat, straightening your legs.
- Send your hips up and back, lengthening your spine and creating an inverted V shape with your body.
- Ground down through your hands, spreading your fingers wide and pressing firmly into the mat.
- Engage your thigh muscles and press your heels towards the floor while keeping your knees slightly bent if needed.
- Relax your head and neck, allowing them to hang freely.
- Take slow, deep breaths, feeling the stretch in your entire body, from your hands to your hips and legs.
- Stay in this pose for several breaths, enjoying the rejuvenation it brings.
Adho Mukha Svanasana increases blood flow to the joints, nourishing them and reducing inflammation. It also strengthens the upper body muscles, which support the shoulder and elbow joints. Practicing this pose regularly can help alleviate joint pain, improve joint stability, and release tension in the spine.
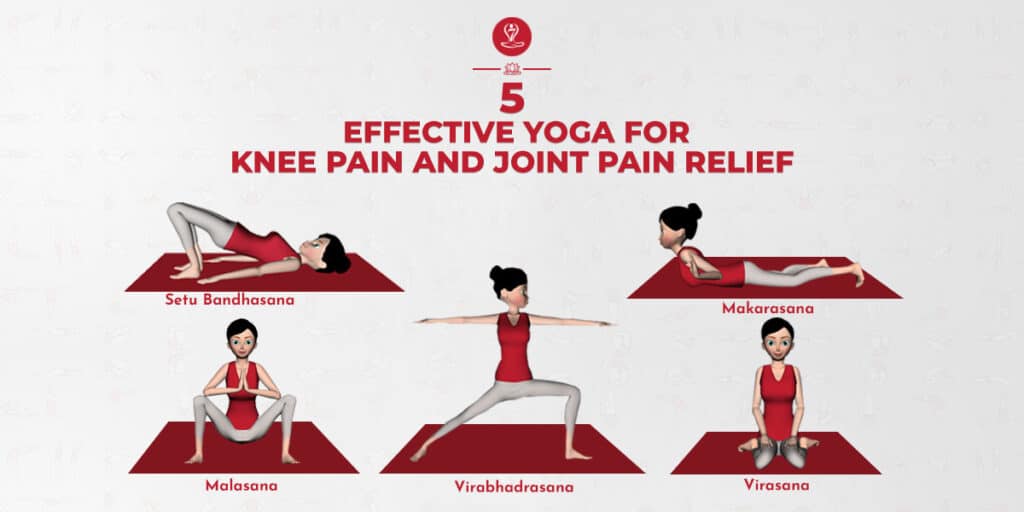
Virabhadrasana II (Warrior II Pose)
Warrior II Pose, or Virabhadrasana II, is a powerful standing pose that strengthens the legs and core while opening the hips. This pose is particularly beneficial for individuals with joint pain as it helps to improve stability, increase awareness of body alignment, and promote overall joint health. Here’s how to practice Virabhadrasana II:
- Stand with your feet about 4-5 feet apart, facing forward.
- Turn your right foot out 90 degrees and pivot your left foot slightly inwards.
- Extend your arms out to the sides, parallel to the floor, palms facing down.
- Bend your right knee, aligning it directly over your ankle, ensuring it doesn’t collapse inward.
- Gaze over your right fingertips, keeping your neck relaxed and aligned with your spine.
- Engage your core and press down through the outer edge of your back foot, stabilizing your stance.
- Hold the pose for several breaths, feeling the strength and stability in your legs and core.
- To come out of the pose, straighten your right leg, pivot your feet to face forward, and repeat on the other side.
Virabhadrasana II strengthens the muscles surrounding the joints, providing increased support and stability. It also opens the hips, relieving tension and promoting improved mobility. By practicing Warrior II regularly, you can strengthen your joints, enhance balance, and maintain proper body alignment.
Viparita Karani (Legs Up the Wall Pose)
Legs Up the Wall Pose, also known as Viparita Karani, is a restorative pose that offers numerous benefits for joint pain relief. By reversing blood flow, reducing inflammation, and relieving swelling in the legs and ankles, this pose promotes relaxation and stress relief. Here’s how to practice Viparita Karani:
- Find a clear wall space and sit sideways next to it, with your hip touching the wall.
- Lie down onto your back and simultaneously swing your legs up the wall, making a 90-degree angle with your body.
- Adjust your position so that your sitting bones are as close to the wall as possible, allowing your lower back to rest on the floor.
- Stretch your arms out to the sides, palms facing up, or place them on your abdomen for added relaxation.
- Close your eyes and take slow, deep breaths, allowing your body to relax fully into the pose.
- Stay in this pose for 10-20 minutes, focusing on your breath and allowing your muscles to release tension.
Viparita Karani reverses blood flow, which helps reduce inflammation and decrease swelling in the legs and ankles. By promoting relaxation and stress relief, this pose also aids in pain management and improves overall well-being. Make Legs Up the Wall Pose a regular part of your yoga practice for optimal joint health.
Incorporating these yoga poses into your daily routine can provide tremendous relief from joint pain and enhance your overall joint health. Remember to practice with awareness, focusing on gentle movements, and listening to your body. With time and consistent effort, you can experience the life-changing benefits of yoga and enjoy a pain-free, active lifestyle.